Session 06
Section 06
Notes from the previous session
- The lecturer may have to reset passwords and VMS from time to time.
- Please attempt to keep up.
- If you are stuck at a point, read the instructions again, you may solve your own issue.
- If you are able to complete a task, please assist students next to you if they struggle.
Instructions
See the Information Page to log into the jump node.
Note
We will all be working on this machine for today’s class.
- Log into the jump node
- Copy the
/opt/example06/directory to your home directory and cd into your home directory:
- Attempt to execute the commands that the instructor is executing
Overview
In this session, we will learn how to change file content using text manipulation tools like sed. After that, we will look at how to use two popular text editors named nano and vi.
Text manipulation using sed
In the previous session, we looked at regular expressions and searched for text in a file using the grep statement. We now need to look at how to modify text in a file.
We will look at the stream editor sed. Several tools, such as sed and awk, can be used for this purpose. However, we will only be looking at sed. To use awk, see the awk manual pages or online sources.
Using sed to modify output
The easiest way to use sed is to execute a command and modify the output using a regular expression (pattern) or specific text.
The sed command has various functions within the command that can be called. We will only use a few available options, which are helpful throughout this course.
Using sed to delete lines containing text/pattern
The first option is to delete lines containing specific text. The syntax is:
/search_string_we_are_looking_to_exclude/d
Note
The forward slash delimiter / is compulsory for the delete option.
For other options, such as the substitute hereafter, the delimiter can be changed to another character, such as % or |.
The same delimiter must be used throughout the command.
For instance, if we print 15 lines and we want to delete a line that contains the number three (3), we can execute the following:
If we want to use a regular expression, we can simply include the regular expression in our search.
For instance:
Using sed to replace specific text
We deleted complete lines in the above examples using the "/search_line_to_delete/d" syntax.
If you want to replace only specific values from a string, you need to use the following syntax:
Example:
- The search and replace function (substitute) starts with an s.
- After that, a delimiter is used.
In this case, a forward slash /. - The delimiter is followed by the string we are looking for.
- Another delimiter / is used to indicate that the replacement is to follow.
- After the string that is replacing the search string, another delimiter / is used.
- After the final delimiter is specified, a value is specified.
This value represents the occurrence at which the replacement should commence.
In the above example, a value of g is used, meaning a global replacement is done.
The g-option is the most common and replaces all occurrences of the text. - Note: the occurrence of a replacement string is per line, so if you specify:
"s/replace_me/with_me/2"then the second occurrence of replace_me in each line, will be replaced by with_me.
Note
Note that other special characters can be delimiters instead of the forward slash /.
Using a pipe character | instead when modifying a path will be easier.
Simple example
Another option is to replace it from the nth position to the last occurrence in the line, using the syntax "s/search/and_replace/ng".
Print a specific line using sed
The sed command can also print specific lines from a file. The print function is used and has the following syntax to print line three of /etc/passwd:
Ranges can also be specified; example:
Changing a file in place, using sed
The above examples simply modified the output provided. The sed command can write modifications to a file using the in-place (-i) option.
Example
Note
Note using a different delimiter (other than / ) is recommended when using paths.
If a forward slash / is used as a delimiter, any forward slashes searched for must be escaped using a backslash \.
The in-place instruction is the most common use for the sed command to modify configuration or template files.
Exercise
Using the examples.log file, search for the following:
- Copy the original /etc/passwd file over the current file in your home directory
- Using
sed, modify the file (in place) to change the nologin at the end of the lines to the word false - Replace all occurrences of
/usr/sbinwith/bin
Note using a different delimiter (other than / ) is recommended
If a forward slash / is used as a delimiter, any forward slashes searched for need to be escaped using a backslash \.
The nano text editor
In a GNU/Linux system, all configurations and data files are usually in plain text format. It is, therefore, valuable for modifying files directly in the terminal. The first and most user-friendly text editor we will look at is nano.
One drawback of the nano editor is that few GNU/Linux systems have nano installed by default.
However, it is available in their package managers, and thus, a simple dnf install nano will install nano on a RedHat-derived Linux system with Internet connectivity.
The nano editor can be used by executing the nano command, followed by the path and name of the file to edit.
Example
An empty file will be created if the file does not exist.
The following figure shows the primary nano interface.
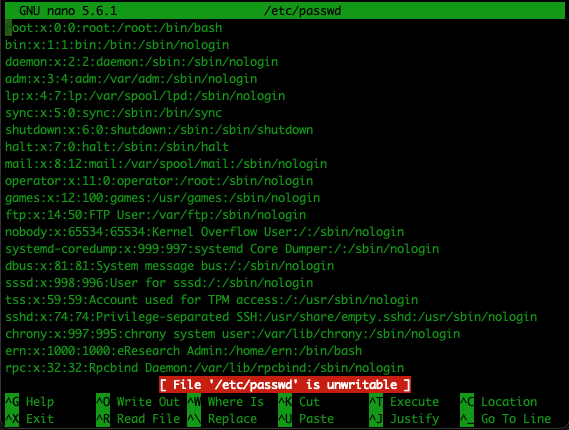
Note the options at the bottom of the screen.
In this case, the most prominent line is the warning that the file is not writable.
For the other options, we see for instance, Ctrl+O will write the current file out (save).
To close nano, we press Ctrl+X
Nano file management
| Task | Keystroke | Notes |
|---|---|---|
| Open a file from within nano | Ctrl+R | NOTE: tab completion is in effect; also, once this command has been entered, notice the new menu items are at the bottom of the screen. For example, Ctrl+T will allow you to browse the file system and look for a file to open. |
| Display the next file buffer | Alt+> | |
| Display the previous file buffer | Alt+< | |
| Save the current file buffer to disk | Ctrl+O | |
| Close the current file buffer | Ctrl+X | NOTE: If the file hasn't been saved, you'll be asked if you want to save it. Also, if only one file buffer is open, closing it will exit from nano. |
Nano copy and paste
| Task | Keystroke | Notes |
|---|---|---|
| Select a region for a cut or paste operation | Alt+A | NOTE: After setting a mark with Alt+A, move the cursor to define the region; you should see it highlighted as you move the cursor. Also, to cancel the definition of the region, just press Alt+A again. |
| Copy a highlighted region into the clipboard | Alt+^ | |
| Cut a highlighted region into the clipboard | Ctrl+K | |
| Paste the contents of the clipboard at the current cursor position | Ctrl+U | |
| Cut from the current cursor position to the end-of-line (EOL) | Ctrl+K | NOTE: This command doesn't require highlighting of the region. |
Nano navigation
| Task | Keystroke | Notes |
|---|---|---|
| Go to the beginning of the file | Alt+\ | |
| Go to end of file | Alt+/ | |
| Move forward one screenful | Ctrl+V | |
| Move backwards one screenful | Ctrl+Y | |
| Go to a target line number | Alt+G | |
| Jump to matching open/close symbol | Alt+] | NOTE: Handy for finding mismatched brace compiler errors! |
| Window scrolling | Alt+= | To scroll down |
| Window scrolling | Alt+- | To scroll up |
| Indenting selected blocks | Alt+A to select a block | Then Alt+} will indent the selected block. |
| Outdenting selected blocks | Alt+A to select a block | Then Alt+{ will outdent the selected block. |
The vi text editor
The first release of vi was in 1976. The vi editor is installed by default in most GNU/Linux distributions. You can use' vi' to modify a repository or network configuration file to install nano on a clean installation.
The vi or newer vim (vi-improved) is a powerful text editor with various commands and shortcuts that are less intuitive and not displayed on screen like for nano. You will notice some syntax highlighting when opening a file such as a configuration or other Linux system file in vi.
Like with nano you can simply use the vi command followed by the path of the file to edit.
The above command will open the vi editor and will look like the following figure:
The most noticeable difference between the nano and vi interfaces, is the syntax/colour highlighting displayed in vi.
The different vi modes
The first concept in learning to use vi is identifying the different modes. Six modes exist, but you will most often only use two modes. Nonetheless, the following table lists and explains the six modes.
| Name | Description | Help page |
|---|---|---|
| normal | For navigation and manipulation of text. vim usually starts in this mode, which you can usually get back to with Esc |
:help Normal-mode |
| insert | For inserting new text. The main difference from vi is that many important "normal" commands are also available in insert mode - provided you have a keyboard with enough meta keys (such as Ctrl, Alt, Win, etc.). |
:help Insert-mode |
| visual | For navigation and manipulation of text selections, this mode allows you to perform most normal commands, and a few extra commands, on selected text | :help Visual-mode |
| select | Similar to visual, but with a more MS Windows-like behaviour. | :help Select-mode |
| command-line | For entering editor commands - like the help commands in the 3rd column. | :help Command-line-mode |
| Ex-mode | Similar to the command-line mode but optimized for batch processing. | :help Ex-mode |
You will most likely only work in the insert and normal mode for 90% of the time.
Two visual modes are essential when working with vi.
| Visual Mode | Key Stroke |
|---|---|
| Visual line mode | Shift+V |
| Visual block mode | Alt+V |
See the Learning vi editor Wiki page for more information on the editor modes.
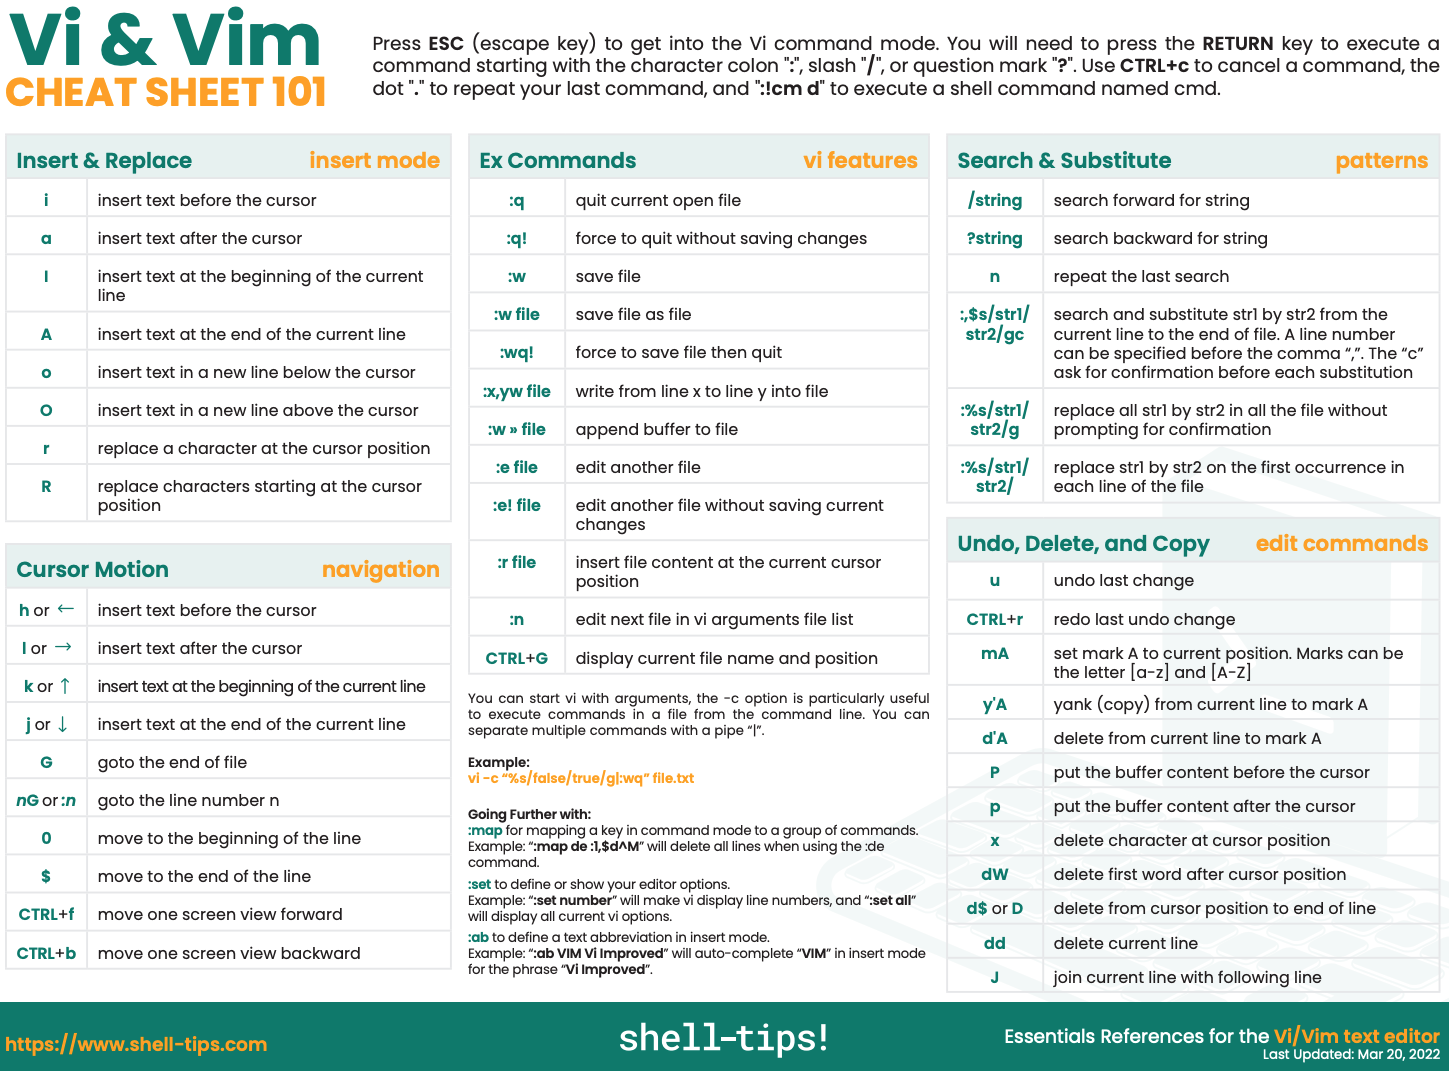
One-pager for vi
The following one pager cheat sheet is included as a quick reference guide.
Some humor

Demonstration using vi
The following demonstration will showcase the regular use of the vi editor.
- The script below should be copied and pasted into a file, named
example06.sh - The script will not work as expected, seeing that the two functions contained in the script, should be defined before they are called
- There is also no indentation, which is fine in bash, but makes reading the code harder
- Two variables (i01 and i02) are ambiguous and should be named better
Note
One can also execute sed-like commands in vi.
To demonstrate, press Esc twice to go into normal mode.
Then press : (colon) to go into command-line mode.
Now, type the following:
%s/iNumber/myNumber/g
Press Enter to execute the sed command.
The above sed command will replace all iNumber entries with myNumber.
Example
- Open the file ~/example06/moby.txt using
vi - Search for the second line starting with ***
- From that position, delete 351 lines
- Go to the first line, delete the first 843 lines
- On which line does Chapter 42 start?
- What is the first word of the 4th sentence in that chapter?
- Go to the bottom of the file
How many lines are in the file? - Save the changes to the current file
- Go to line 6789
- Go into visual line mode
- Go to the end of the paragraph
- Yank the selection
- Execute the following in the command-line mode:
:6789,6828w long.txt - Exit
vi - Execute the following command in the shell to see the word count of the long.txt file:
cat long.txt | wc - Execute a similar command to see how many lines the
~/example06/moby.txtfile contains now
It should be the same value (21122) as observed when going to the end of the file in a previous instruction
More advanced commands in vi
In a previous challenge, you were asked to create a file with 99 entries in the format:
172.21.0.101 trn-usr01 trn-usr01.examplesdomain.com
172.21.0.102 trn-usr02 trn-usr02.examplesdomain.com
…
…
172.21.0.199 trn-usr99 trn-usr99.examplesdomain.com
This section is quite advanced and will most likely not be something you would often (or ever again) attempt in a text editor. This is only to showcase some of the powerful actions that can be performed in a text editor.
Let’s create this file in vi, carefully following the instructions:
Example
- Execute the following command to create a file in your home directory:
- Press 99 followed by I (lower case i)
This will instructvito execute the following insert statement 99 times. - Type (or paste) the following line:
- Press Enter to go to the following line
- Press Esc
99 lines with the exact text will appear, followed by an empty line - Delete the last (empty) line:
Press D+D (lower case d, twice) - Go to the second line:
Press :+2+Enter (colon + 2 + enter) - Scroll to the zero of 101 (column 11), having the cursor blink on the zero
- Press Ctrl+V to enter the visual block mode
- Press Shift+G to go to the last line of the file
Note that the first columns will be highlighted - Press the Right (right arrow) until the last two digits (01) of the 101 column are selected
- Press G to execute a global change
- Press Ctrl+A to add one and auto increment each line in the column
- Press :+2 (colon + 2) to go to the second line again
- Move the cursor to the 0 of trn-usr01
- Press . (period) to repeat the previous command
- Move the cursor to the 0 of trn-usr01.examplesdomain.com
- Press . (period) again to repeat the previous command
- Press Shift+G to go to the last line in the file
You will notice that all the lines were modified - Press :+X (colon + x) to write and save the file
Timed Challenge
Execute the following code block (COPY AND PASTE)
Await further instructions.Note
Execute the command: c to see the status of your results and submit it if it was correct.
Reminder
This time it is not necessary, but always remember to switch off your VM!